Set Your Holiday Table Like a Pro
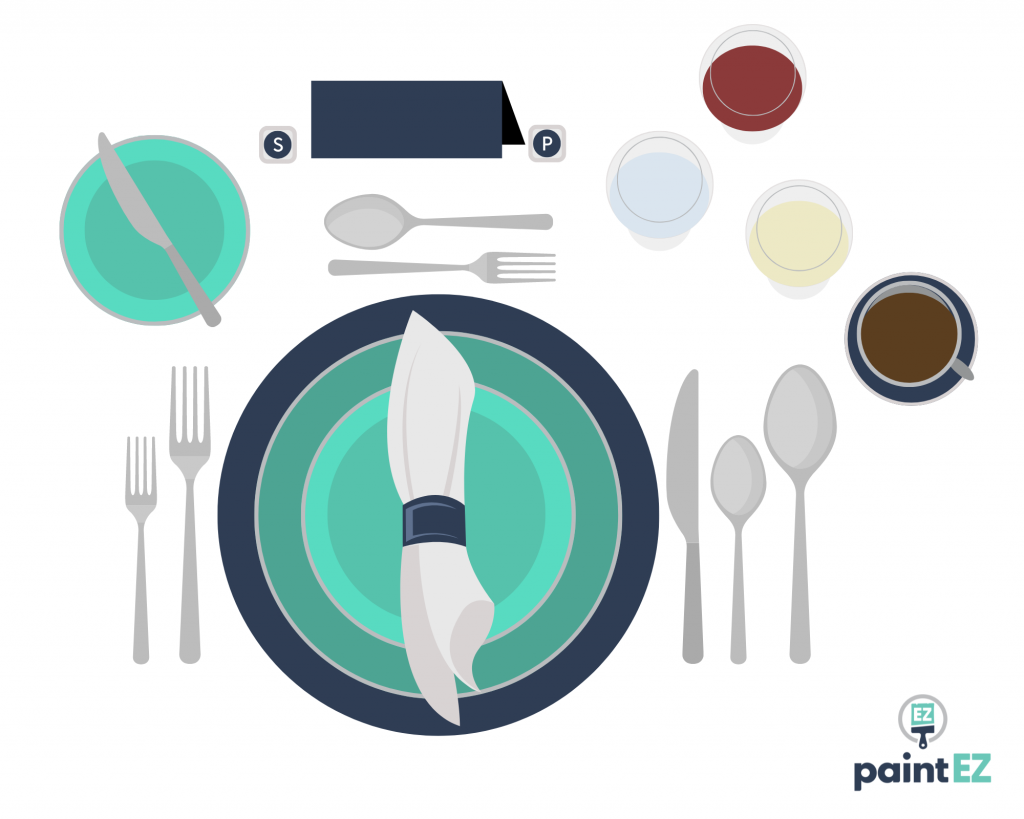
If you're wondering how to set a formal place setting for your holiday meal, look no further! This guide will walk you through the process step-by-step, with a helpful cheat sheet to make it easy to follow.
Follow these simple instructions and you'll have a beautifully set table in no time!
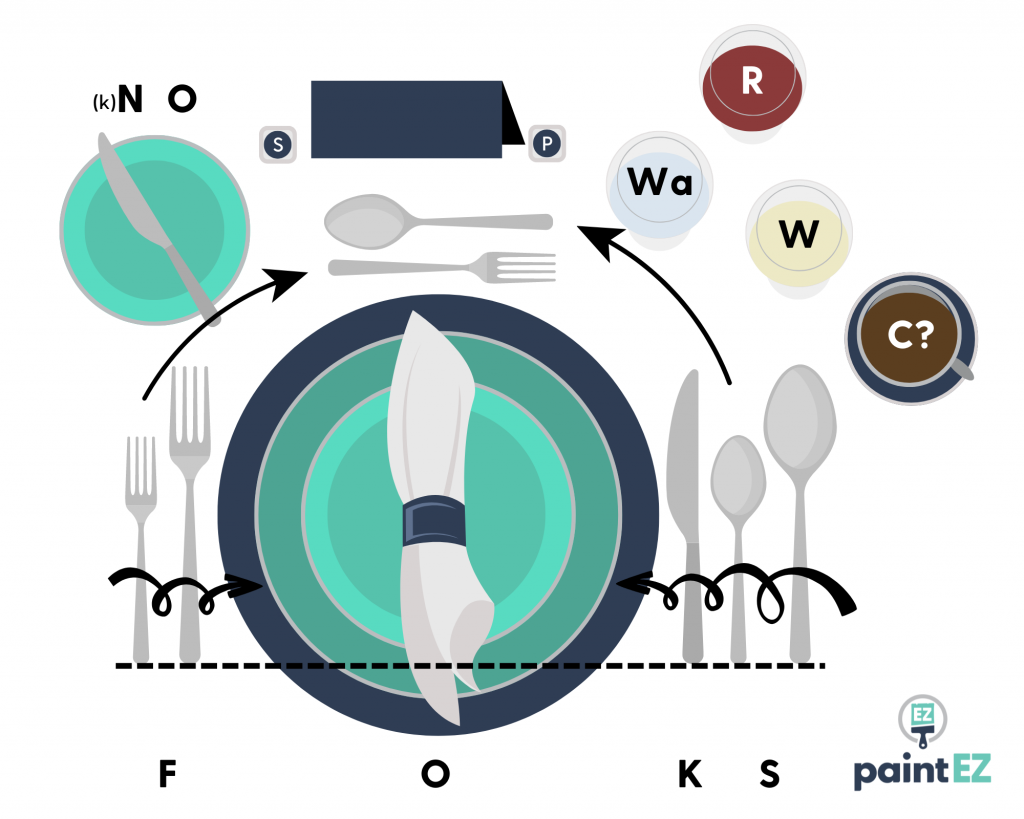
1. NO FOKS (to give)

After a long day of cooking and cleaning, you probably have no more foks to give! It'll all be over soon, and in the meantime, use this handy acronym to help you remember where silverware and plates go.
Moving from left to right:
- kNife (butter knife)
- O (bread plate)
The bread plate is the smallest plate in the set. It goes at the top left corner, above the forks.
The butter knife is the smallest knife. It's placed on the bread plate, with the sharp edge facing down toward the forks, and the handle pointing to the right. It can be placed either diagonally(pictured) or horizontally across the bread plate.
- Forks
- O (plates)
- Knives
- Spoons
Aside from the small bread plate, the other plates go between the cutlery, stacking from largest to smallest.
The charger is a large, purely decorative dish that isn't eaten from. It goes on the bottom of the stack, centered with the dinner fork. It should be placed 1" from the edge of the table.
The service/dinner plate is the largest plate that you're accustomed to eating from.
The medium-sized salad plate is next.
If there's a soup bowl*, it will be the last layer in this dish stack.
*If using a soup bowl, the folded cloth napkin should be placed to the left. The napkin can either go beside the forks on the left, or the forks may rest on top of it.
A cloth napkin with a napkin ring, or that is decoratively folded, is centered on top of the salad plate.
2. Get in line
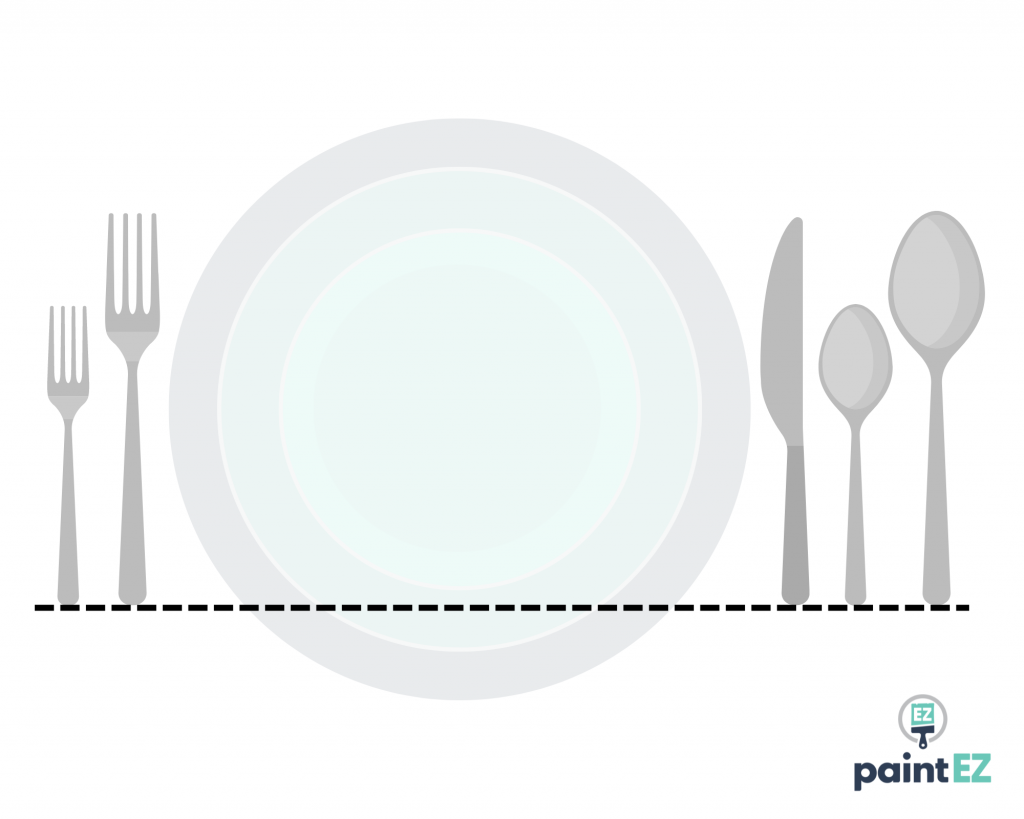
Place the largest fork so that it's centered evenly with the charger/plates, to their left. The heals of all cutlery should be aligned with the bottom of the fork, creating a straight line.
The cutlery heads (the part that goes in your mouth) should be close together, but not touching.
3. Outside-In

When eating with multiple forks and spoons, (generally) diners work from the outside-in —especially if the meal is served in courses.
Main course silverware is placed to the plate side that corresponds with the hand that uses it (forks on the left, knives/spoons are on the right).
For supplementary cutlery such as the bread knife and dessert utensils, their handles are pointed in the direction of the hand that will use it (more on this in a moment).
Layer 1: The dinner fork (big) is centered with the service plate. The big knife is opposite, with the sharp edge facing in toward the plate. These utensils should be beside the plate/charger, and not tucked underneath it.
Layer 2: Next is the dinner spoon (medium) and the salad fork (small).
Layer 3: The soup spoon (big) is on the outer-most layer, farthest from the plate. Only set this spoon if soup/stew will be served.
Above the plate: Dessert cutlery (the tiniest in the collection) goes up top. To get the order right, remember: first, you're down to fork, and then, you're up for some spooning.
If you have extra silverware settings, don't feel obligated to set them out if diners won't be using them, as this may cause confusion and result in extra dishes to wash. If there is a purpose, however, place the utensils with their like-kind in the order that they'll be used (working from outside-in). For example, a steak knife will typically be closest to the plate (layer 1) because it will be used later in the meal.
4. Get a handle on things

Not sure which way those dessert utensils should be facing? Imagine the utensil starts beside the plate with others of its kind, and then it glides around the perimeter of the plate until it reaches the top. The fork moves up from the left, and the spoon moves up from the right.
This is even true with the butter knife. If it started out with the dinner knife on the right side of the place setting, and then traveled up and over, it would end up on the bread plate with the handle to the right, and the sharp edge to the left.
If you're serving a post-meal hot drink, the teacup handle goes to the right so that it's easily picked up with the right hand.
5. Shake things up

If you have individual salt and pepper shakers for each place setting, they go at the top, above the dessert utensils. Salt on the left, pepper is on the right.
If there is a name card, it goes between the salt and pepper shakers.
6. Quench your thirst for knowledge
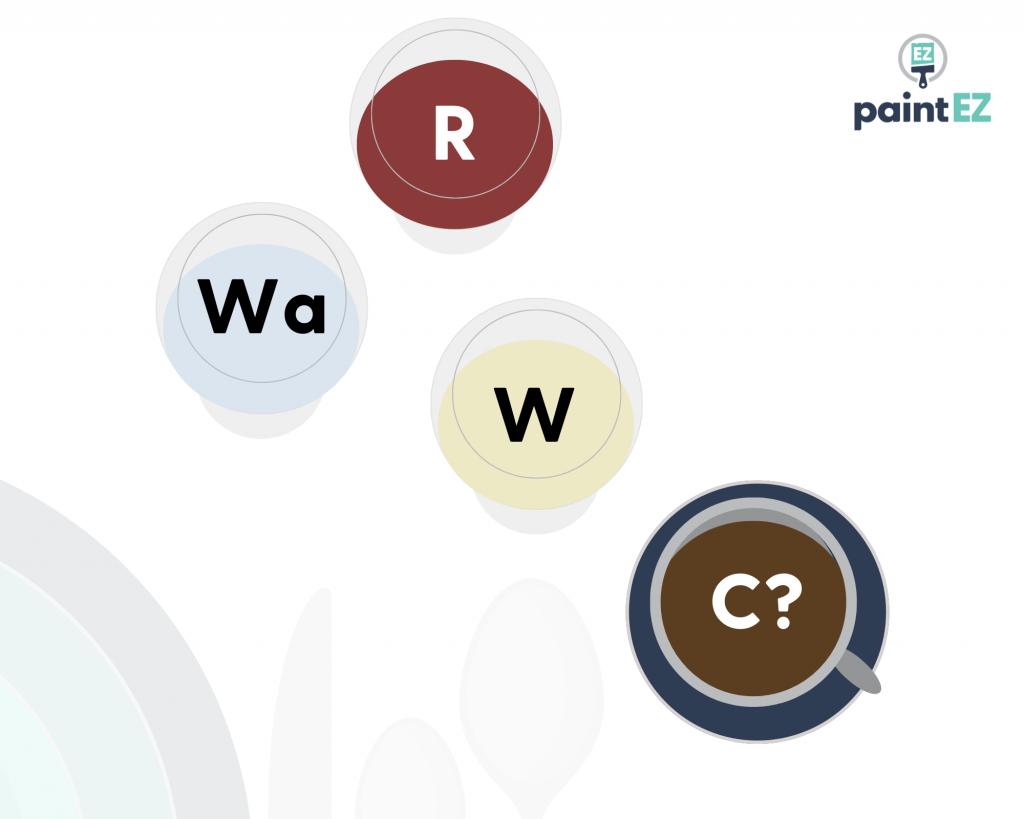
You probably know that your drink goes on the right, but what if there are multiple beverages?
There's another helpful acronym to help you remember the order drinks go in. If you come from an exceptionally large family, this may seem relatable.
From left to right: Wait, R We Cousins?
- Water
- Red wine
- White wine
- Coffee
The red wine glass can be placed either above the other drinks (as pictured), or to the right of the water.
Coffee is served after dinner, and is farthest to the right with its handle facing to the right.
If sparkling cider is served instead of alcohol, it takes the place of the wine glass.
Final Thoughts
That's it! Setting a formal table isn't difficult once you have the hang of it, and now you can confidently set out the good china without fear of your mother-in-law's judgement —well, at least about how you set a table...(good luck!)
Happy Holidays, and Bon Appétit!
Formal Table Cheat Sheet
